Using the telescope mount with the computer
Below is a list of guidelines to get the telescope mount working together with the computer. Click on a link for more specific details:
-
-
-
-
-
Click the button Connect
Click the button Set Telescope Time
-
After observing:
-
-
Troubleshooting
Detailed usage of the mount using the computer
Switch on the mount
Switch on the mount at the south-side of the pillar by pushing the power switch shortly to the left. A red light will switch on and the handheld remote will shortly show the series- and version number, followed by messages like:
10MICRON - Comec
Booting... EUR
QCI Version 2.7.9
Initializing motors
When the mount has fully started, the date and time appear in the display of the handheld remote. After about seventy seconds the mount is ready for usage.
top of the page
Switch on the computer
Switch on the computer and the display. After a few minutes you end up at the windows desktop.
top of the page
Start the program Cartes du Ciel
You can start the application Cartes du Ciel, hereafter called CdC, by clicking its icon on the desktop or taskbar, or via the Start menu: Start → All programs → Cartes du Ciel.
top of the page
Check date and time settings
Ensure that the system date and time of the computer are in sync with the
current time! The date and time are shown in the lower right corner of the
screen. As the computers in the domes are connected to a NTP server, this
should already be the case.
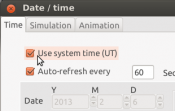
 Check the date and time settings of CdC. Click on the clock icon in the left
icon-bar Select use system time and Auto-refresh.
top of the page
Open the telescope configuration window
The figure on the left shows the icons in the icon bar that provide
the telescope functionality. From left to right these are:
Telescope configuration window;
Synchronize telescope;
Point telescope to object;
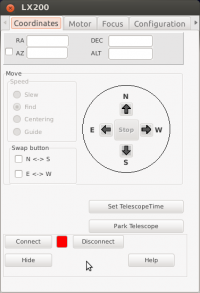
Click on the leftmost telescope icon. The telescope configuration window
will pop up (see image).
 Click the connect button. If all is configured well,
after a few seconds the red square will turn green. If it fails to connect,
i.e. the square stays red, check the *port configuration* tab. This should
contain the following settings:
Serial port: COM1
Speed: 9600
Data bits: 8
Parity: N
Stop bits: 1
Timeout [ms]: 1000
Interval timeout: 250
If these settings still result in a failing connection try a higher value of the
interval timeout.
After connecting the telescope, click on the button Set telescope time. The
system time of the computer will now be loaded in the mount of the telescope.
You can hide the telescope configuration window by pressing the hide button.
top of the page
Point the telescope to the object
If you want to point the telescope to a particular object do the following:
Find the object on the map of CdC;
Select the object;
Press the rightmost telescope icon, or
Right click on the object and select Telescope → Slew;
top of the page
Park the telescope
After finishing your observation, the telescope needs to be parked in the vertical
position. The telescope mount contains 3 park positions:
Vertical position west from the pillar.
A location at the horizon
Vertical position east from the pillar.
From the three parking positions only one can be assigned as the standard
parking position. When the mount receives an instruction to park the telescope,
it will use this parking position. Park position 1 is usually the default
park position.
Via CdC:
In the telescope configuration window click the button Park telescope.
Via the handheld control:
Press the Menu button;
Using the arrow buttons, scroll to Alignment and press Enter;
Scroll to Park and press Enter.
Confirm the parking by pressing Enter;
The mount will now move to the parking position.
note: To be able to move the telescope after it is parked, you first have to unpark
it using the handheld control!
top of the page
More detailed troubleshooting
The mount doesn't move: unpark the mount via the handheld control
After starting up the mount, it can be in the parking mode. This means you
cant move the telescope by pressing the direction buttons on the handheld
control. To unpark the telescope, navigate the following menu items on the
handheld control: Menu → Alignment → Enter → Unpark →
Enter. When the handheld control asks for a confirmation, press Enter.
top of the page
Synchronize the telescope position with the object on the computer
If the selected objects aren't shown in the center of your field of view, you can
synchronize the telescope position in the map of CdC with that of the position
of the telescope mount.
Point the telescope to a well known star. You can optimize the position of the star in the field of view by using the arrow buttons on the handheld control. Ensure that the location of the star is in the center of the field of view before proceeding to the next step.
Find the star that you have pointed the telescope to on the map of CdC. You can do this by using the menu Edit → Advanced Search. Or click on the binocular icon. Or scroll the map by pressing the middle mouse button while moving the mouse. If the map doesn't scroll, disable the 'scroll lock' by clicking on the anchor icon so that it is turned off.
Select the star by clicking it using the left mouse button.
Click the middle of the 3 telescope icons (Sync). If a confirmation question is shown to center on <object name>, click OK. If no object name is shown, retry this step again.
top of the page
Check the driver settings
Check if the serial cable from the mount is physically connected with the computer.
Open the CdC system settings window from the menu bar via Setup → System. Select the
Telescope tab. Ensure the following settings are used:
Select the CdC plugin as the telescope interface.
Select “Meade.tid” as the Telescope plugin.
top of the page


